
From Code to PyPI: Automate Python Package Publishing with GitHub Actions
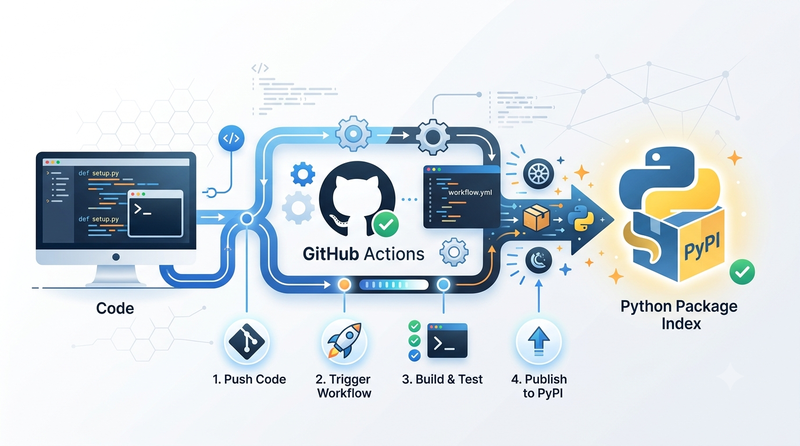
So you have built a Python package, it works great on your machine, and now you want to anyone to run pip install <package> to use it. That last mile - from "runs locally" to "installable from PyPI with one command" - turns out to be a headache to a surprising number of people because it's conceptually hard. This tutorial cuts through that friction. We will use a real project called lucky-cli - a lottery ticket generator/checker CLI package - to walk you through the practical steps after development: building the package, versioning it automatically, setting up PyPI credentials, and wiring a CI pipeline via GitHub Actions for making predictable, repeatable, and safe releases.
What is PyPI?
The Python Package Index (PyPI) is a repository of software for the Python programming language. PyPI helps you find and install software developed and shared by the Python community. And, Package authors use PyPI to distribute their software.
Prerequisites
To follow this tutorial to push your Python package to PyPI, please make sure you have:
- A Python project with pyproject.toml config
- A Git repo pushed to Github
- Python package and env management tool - uv
- A PyPI account
- Gihub Actions enabled for your repo
A CLI Project Overview
Let's take a quick look at the project of this tutorial - lucky-cli: a Typer-based CLI package that generates and check lottery tickets, It's backed by SQLite and ships with three commands:
$ lucky --help
 Usage: lucky [OPTIONS] COMMAND [ARGS]...

 lucky — lottery ticket generator, checker, and stats CLI.

╭─ Options ───────────────────────────────────────────────────────────────────╮
│ --version          Show the installed version and exit.                     │
│ --help             Show this message and exit.                              │
╰─────────────────────────────────────────────────────────────────────────────╯
╭─ Commands ───────────────────────────────────────────────────────────────────╮
│ pick   Generate one or more valid random tickets for GAME.                   │
│ check  Check NUMBERS against the latest draw for GAME.                       │
│ show   Show the latest draw for GAME, or its --history / --stats.            │
╰──────────────────────────────────────────────────────────────────────────────╯

# Example usage
$ lucky pick powerball --count 3
$ lucky check mega-millions 5 19 27 41 63 --special 22
$ lucky show powerball --stats
This CLI package was developed using Claude Code, a coding agent from Anthropic, in about an hour.
# Claude Code output
...
● lucky-cli v1 is merged into main. Summary:

  - What's built: full Typer CLI (pick/check/show/--version) for Powerball and Mega Millions, backed by SQLite/SQLAlchemy with JSON-array main/special columns, auto-synced from bundled per-game JSON fixtures on
  every invocation (silent when current, progress bar when not, never crashes on failure).
  - Process: brainstormed → spec → 19-task plan → subagent-driven implementation (fresh implementer + reviewer per task, fix loops where needed) → final whole-branch review (Ready to merge: Yes) → merged.
  - Tests: 75/75 passing on main.
  - Local main is 30 commits ahead of origin/main — nothing has been pushed; let me know if you'd like that pushed up.

✻ Churned for 1h 9m 47s
This tutorial skips the development process and jumps straight to the last mile—packaging, versioning, and publishing.
Build the Package
"Building" a Python package just means turning your source tree into the two artifacts PyPI actually accepts: a source distribution (.tar.gz) and a wheel (.whl). Modern Python packaging delegates this to a build backend declared in pyproject.toml — lucky-cli uses setuptools, paired with setuptools-scm for versioning (more on that in a second):
[build-system]
requires = ["setuptools>=68", "setuptools-scm>=8"]
build-backend = "setuptools.build_meta"

[project]
name = "lucky-cli"
dynamic = ["version"]
dependencies = [
    "httpx>=0.28.1",
    "rich>=15.0.0",
    "sqlalchemy>=2.0",
    "typer>=0.26.7",
]

[project.scripts]
lucky = "lucky.cli:app"

[tool.setuptools.packages.find]
where = ["src"]
A few things worth calling out:
dynamic = ["version"]tells setuptools "don't look for aversion =line here, go ask the build backend instead" — that's the hooksetuptools-scmuses.[project.scripts]is what turnspip install lucky-cliinto an actualluckycommand on your$PATH— it points at a callable (app, atyper.Typer()instance) insidelucky.cli.[tool.setuptools.packages.find] where = ["src"]tells setuptools your importable code lives undersrc/lucky/, not at the repo root — thesrc/layout is a small extra step that prevents an entire category of "it imports fine locally but breaks once installed" bugs, because you can't accidentally import the package without installing it first.
Enter into your project directory, and run uv sync to create/update the virtual environment and install your project dependencies. Then run the following command to build:
$ uv build
Building source distribution...
...
Successfully built dist/lucky_cli-0.0.1.dev37+g5b24dc818.tar.gz
Successfully built dist/lucky_cli-0.0.1.dev37+g5b24dc818-py3-none-any.whl
This command creates a directory dist/ and build your package into a source distribution (.tar.gz) and a wheel (.whl). uv uses the build backend configured in your pyproject.toml (setuptools, hatchling, poetry-core, etc.), so you usually do not need python -m build command.
Alternatively, if you use other tools to build, for example, python -m build or poetry build.
Sanity-check them with twine (the tool that also handles the actual upload later):
$ twine check dist/*
Checking dist/lucky_cli-0.0.1.dev37+g5b24dc818-py3-none-any.whl: PASSED
Checking dist/lucky_cli-0.0.1.dev37+g5b24dc818.tar.gz: PASSED
If that passes, your package is structurally valid and ready to upload. We won't upload it by hand, though — that's what the release pipeline is for.
Automatic Versioning
Here's a rule worth adopting early: never hand-write a version number into your code. Instead, use setuptools-scm to read the version from git tags at build time.
Example config:
[tool.setuptools_scm]
fallback_version = "0.0.0"
How it works:
- If
HEADis onv0.2.0, the package version becomes0.2.0. - If there are extra commits after the tag, it becomes a dev version like
0.2.1.dev3+gabc1234. - If there are no tags yet, it uses
fallback_versioninstead of failing.
This keeps your source clean and avoids stale __version__ values.
Build Result Interpretation
For our build result lucky_cli-0.0.1.dev37+g5b24dc818 means:
0.0.1→ the inferred base version (based on the fallback version).dev37→ 37 commits after the base point (or 37 commits in the repo history according to setuptools-scm's calculation)+g5b24dc818→ Git commit hash
When we run --version command, we an see the version printed:
$ lucky --version
0.0.1.dev37+g5b24dc818.d20260625
│      │     │          │
│      │     │          └─ date stamp (2026-06-25)
│      │     └─ git commit hash
│      └─ 37 commits after the inferred version point
└─ base version
What happens behind the command lucky --version? At runtime, it read the installed version using the normal Python way:
from importlib.metadata import version as pkg_version
print(pkg_version("lucky-cli"))
Build with Git Tag
Make sure the git status is clean, then we give a tag in the git repo:
# Check status
$ git status
On branch main
Your branch is up to date with 'origin/main'.

nothing to commit, working tree clean

# Tag repo
$ git tag -a v0.0.3 -m 'v0.0.3'
Then, re-run the build command:
$ uv build
...
Successfully built dist/lucky_cli-0.0.3.tar.gz
Successfully built dist/lucky_cli-0.0.3-py3-none-any.whl
As you can see the version changed with this build. And, we can install the CLI package using the .whl at the local,
$ uv pip install dist/lucky_cli-0.0.3-py3-none-any.whl

Resolved 17 packages in 171ms
Prepared 1 package in 4ms
Uninstalled 1 package in 0.50ms
Installed 1 package in 4ms
 - lucky-cli==0.0.1.dev37+g5b24dc818.d20260625 (from file:///home/jerry/Workspace/pydeployer-examples/lucky-cli)
 + lucky-cli==0.0.3 (from file:///home/jerry/Workspace/pydeployer-examples/lucky-cli/dist/lucky_cli-0.0.3-py3-none-any.whl)
Then verify the version using --version command:
$ lucky --version
0.0.3
After we changed any file without commits, and build again, the version would bump to 0.0.4 automatically.
$ uv build
...
Successfully built dist/lucky_cli-0.0.4.dev0+g6e695db49.d20260625.tar.gz
Successfully built dist/lucky_cli-0.0.4.dev0+g6e695db49.d20260625-py3-none-any.whl
Deciding the next version number
Since the version comes from a tag, "versioning" really just means deciding which tag to create next, and that decision should be deterministic, not a vibe. Conventional Commits gives you that determinism for free if you adopt the convention early:
| Commit prefix | Version bump |
|---|---|
| fix: | PATCH (`0.1.0` → `0.1.1`) |
| feat: | MINOR (`0.1.0` → `0.2.0`) |
| feat!: or BREAKING CHANGE: | MAJOR (`0.1.0` → `1.0.0`) |
To figure out the bump for your next release, look at what's landed since the last tag:
# last tag, e.g. v0.2.0
$ git describe --tags --abbrev=0

# everything since
$ git log v0.2.0..HEAD --oneline
Skim the prefixes, take the highest bump present, and that's your next version number. It sounds manual, but it's a 30-second skim, not a debate — that's the entire point of the convention.
Setting Up PyPI Account
If you've never published to PyPI before, this part takes about a few minutes.
Creating the Account
Head to https://pypi.org/account/register/ and create an account — email, username, password, and you'll want two-factor authentication turned on (PyPI has required 2FA for most publishing actions for a while now, and you'll be glad you have it set up before you need it under time pressure).
It's worth also creating an account on https://test.pypi.org/account/register/ — a separate, fully isolated instance of PyPI meant for exactly this kind of dry run. If you want to rehearse a release without permanently claiming your package name on the real index, publish to TestPyPI first and confirm it installs cleanly.
$ twine upload --repository testpypi dist/*

$ uv pip install --index-url https://test.pypi.org/simple/ your-package
Generating an API Token
Don't use your account password for uploads — PyPI deprecated that path for good reason, and it won't work with 2FA enabled anyway. Instead, generate a scoped API token:
- Log in, go to Account settings → API tokens.
- Click Add API token.
- Scope it to the specific project if it already exists on PyPI (you can only do project-scoped tokens after the first upload, which has to use an account-wide token — that's a one-time exception).
- Copy the token immediately — it's shown exactly once, in the form
pypi-AgEIcHlwaS5vcmc.... If you lose it, you revoke it and generate a new one; there's no "show again."
After the token was generated, it also shows instruction about how to use it:
- Set your username to
__token__ - Set your password to the token value, including the
pypi-prefix
Treat this token like a password. It grants upload rights to your project — don't paste it into a commit, a Slack message, or a comment.
GitHub Actions Release
Now we connect the token to the release flow: pushing a v* git tag triggers GitHub Actions to run tests, build the package, and upload it to PyPI — so you never have to type twine upload manually.
Add the Token as a Repository Secret
The workflow needs your PyPI token, but it obviously can't live in the repo in plain text. GitHub Actions secrets solve exactly this:
1. In your GitHub repo, go to Settings → Secrets and variables → Actions.
2. Click New repository secret.
3. Name it PYPI_API_TOKEN, paste the token value, save.
That's it — the secret is encrypted at rest, never shown again in the UI, and only injected into workflow runs as an environment variable, never printed to logs.
The Release Workflow in .github
Here's the complete release workflow for lucky-cli, at .github/workflows/release.yml:
name: Release

on:
  push:
    tags:
      - "v*"

jobs:
  release:
    runs-on: ubuntu-latest
    steps:
      - uses: actions/checkout@v4
        with:
          fetch-depth: 0
      - uses: actions/setup-python@v5
        with:
          python-version: "3.13"
      - run: pip install build twine pytest setuptools-scm
      - run: pip install -e .
      - run: pytest
      - run: python -m build
      - run: twine check dist/*
      - name: Publish to PyPI
        env:
          TWINE_USERNAME: __token__
          TWINE_PASSWORD: ${{ secrets.PYPI_API_TOKEN }}
        run: twine upload dist/*
Walking through the pieces that aren't self-explanatory:
- on: push: tags: ["v*"] — this workflow does nothing on regular commits or PRs. It only fires when you push a tag starting with v (so v1.2.0 triggers it, a branch push does not). That's a deliberate gate: tagging is the explicit "yes, ship this" action.
- fetch-depth: 0 — GitHub Actions checks out a shallow clone (depth 1) by default, which only has the latest commit and no tag history. setuptools-scm needs the full tag history to compute the version, so this line is non-negotiable — skip it and your build will silently fall back to a wrong version.
- pytest runs before build — this is the whole point of putting tests in the pipeline at all: a failing test aborts the job before anything gets built or uploaded. There's no continue-on-error anywhere in this file, so a red test suite genuinely blocks a release; it can't accidentally ship broken code.
- TWINE_USERNAME: __token__ — this literal string, not your PyPI username, is what tells twine "authenticate with an API token, not a password." The actual token goes in TWINE_PASSWORD, pulled from the secret you just created.
Trigger the GitHub Actions
With the workflow in place, releasing is now four steps, and three of them are git commands you already know:
1. Decide the version using the Conventional Commits table above.
2. Update the code base with your development.
3. Commit, tag, and push to GitHub repository.
4. Watch the Actions tab. The moment that tag lands on GitHub, the release workflow kicks off — tests, build, twine check, upload.
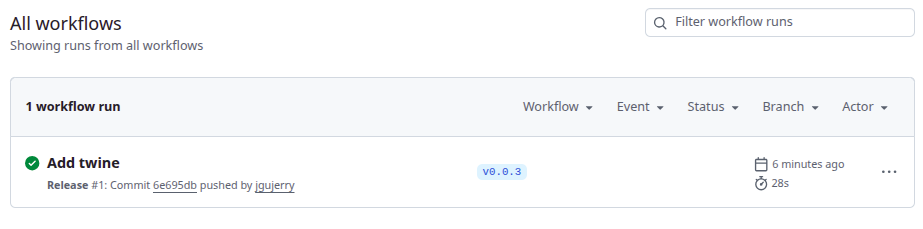
Again - No twine upload typed by hand, no version string edited anywhere, no "did I remember to run the tests first" — the tag is the release, and the pipeline enforces the rest.
Try "pip Install"
A few minutes later, we can check the PyPI url - https://pypi.org/project/lucky-cli/
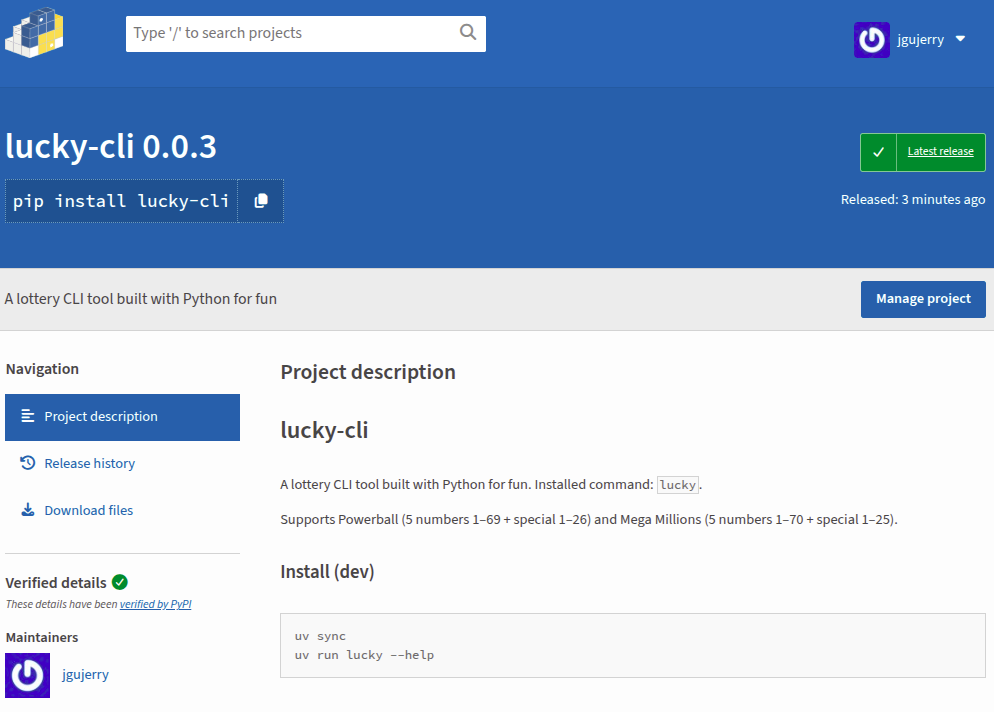
Now, the command pip install lucky-cli works for anyone on Earth.
We can create a fresh new Python virtual environment and test it:
# Create an empty dir
$ mkdir test-cli && cd test-cli

# Create a virtual env
$ python3 -m venv .venv

# Activate the venv
$ source .venv/bin/activate

# Run pip install
$ pip install lucky-cli

# Verify the installation
$ lucky --version
0.0.3
Everything works!
Let's Recap
Let's tie it together. The path from a working local CLI to a published PyPI package has four moving parts, and once they're set up they basically run themselves:
- Build is just uv build against a correctly configured pyproject.toml (src-layout, a build backend, a [project.scripts] entry point) — and twine check dist/* catches structural problems before you ever try to upload anything.
- Versioning stops being a manual chore once you hand it to setuptools-scm and git tags — there's no file to remember to edit, only a tag to decide on, and Conventional Commits makes that decision mechanical instead of a judgment call.
- PyPI setup is a one-time five-minute task: register an account, turn on 2FA, generate a scoped API token, and store it somewhere safe (a GitHub Actions secret, in our case) — never your account password.
- Release pipeline turns all of the above into a single trigger: push a v* tag, and GitHub Actions runs your tests, builds the artifacts, and uploads them — with the tests gating the upload so a broken build can't ship.
The net result is that "releasing" stops being a special, scary, multi-step ritual you have to remember correctly under pressure, and becomes the simple git commands every single time. That predictability is worth more than it sounds like — it's the difference between shipping fixes the same day they're ready, and putting it off because the release process is annoying enough to avoid.
If you like to learn more from the source code, here's the GitHub repo - lucky-cli. Please free feel to reach out if having any issue or question.